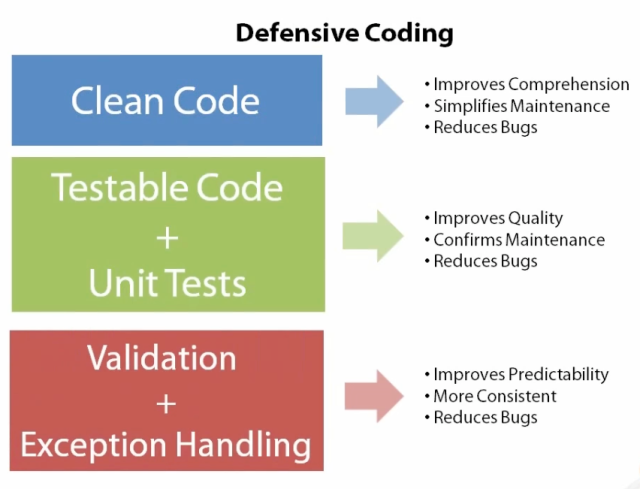
Clean Code:
- Easy to read
- Sample
- Minimal
- Thoughtful
Verify and Coding contract
- Parameters
- Data
- Return Type
- Exception
Clean, Testable, Predictable Methods:
- Good Name
- Focused Code
- Short
- Exception
Clean Code:
Verify and Coding contract
Clean, Testable, Predictable Methods:
The official demo for Angualr 4 is using angular CLI to create project and run it. This approach is not friendly If you want to create a web application has .NET or Node.js as server side and Angualr 4 as client side.
Iet’s take a look inside the project created by angular CLI.

package.json : determain the library needed.
tsconfig.json : ts compiling
tslint.json : syntax checking
.angular-cli.json
I create a Node.js project and copy the content of those config files. And follow the document WEBPACK: AN INTRODUCTION [https://angular.io/docs/ts/latest/guide/webpack.html] to create webpack config file.
The key point is how to setup typescript:
“lib”: [ “es2016”, “dom” ]
 I used webpack to compile and bundle all of the client side code into client_dist and reference them in the tempalte of Node.js
The project can be found at https://github.com/benjaminhuanghuang/nodejs-ng4-seed
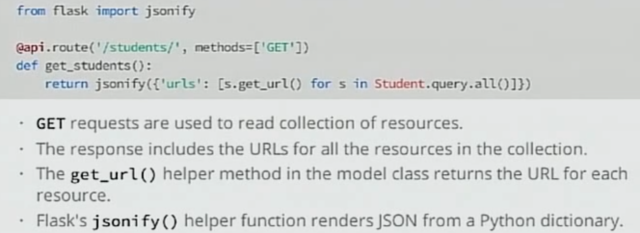
Server Side:
@userprogressreport.route(‘/filedownload’, methods=[‘POST’])
def filedownload():
csv = “”””REVIEW_DATE”,”AUTHOR”,”ISBN”,”DISCOUNTED_PRICE”
“1985/01/21″,”Douglas Adams”,0345391802,5.95
“1990/01/12″,”Douglas Hofstadter”,0465026567,9.95
“1998/07/15”,”Timothy “”The Parser”” Campbell”,0968411304,18.99
“1999/12/03″,”Richard Friedman”,0060630353,5.95
“2004/10/04″,”Randel Helms”,0879755725,4.50″””
file_name = “a.csv”
response = make_response(csv)
# This is the key: Set the right header for the response
# to be downloaded, instead of just printed on the browser
response.headers[“Content-Disposition”] = “attachment; filename=”+file_name
return response
Client Side:
$scope.exportUserProgressData = function () {
var params = $scope.getQueryParameter();
$q.all([SkillStatisticsModelFactory.apiPostProxy(“exportUserProgressData”, params)]
).then(function (response) {
var blob = new Blob([response[0].data], {type: “text/plain”});
$scope.saveAs(blob, ‘File_Name’ + ‘.csv’);
}, function (err) {
//console.log(err);
});
};
$scope.saveAs = function(blob, fileName)
{
if (window.navigator.msSaveOrOpenBlob) {
navigator.msSaveBlob(blob, fileName);
} else {
var link = document.createElement(‘a’);
link.href = window.URL.createObjectURL(blob);
link.download = fileName;
link.click();
window.URL.revokeObjectURL(link.href);
}
}
2. download excel file
server side
@userprogressreport.route(‘/mathjoy/api/v1.0/exportUserProgressData’, methods=[‘POST’])
def export_user_progress_data():
response = excel.make_response_from_array([[1, 2], [3, 4]], “xlsx”, file_name=”export_data”)
client side
$scope.exportUserProgressData = function () {
var params = $scope.getQueryParameter();
//$q.all([SkillStatisticsModelFactory.apiPostProxy(“exportUserProgressData”, params)]
//).then(function (response) {
// //var blob = new Blob([response[0].data], {type: “text/plain”});
// //$scope.saveAs(blob, ‘my_excel’ + ‘.csv’);
// var blob = new Blob([response[0].data], {type: ‘application/vnd.openxmlformats-officedocument.spreadsheetml.sheet’});
// $scope.saveAs(blob, ‘my_excel’ + ‘.xlsx’);
//}, function (err) {
// //console.log(err);
//});
$http({
url: ‘mathjoy/api/v1.0/exportUserProgressData’,
method: ‘POST’,
responseType: ‘arraybuffer’,
data: params,
headers: {
‘Content-type’: ‘application/json’,
‘Accept’: ‘application/vnd.openxmlformats-officedocument.spreadsheetml.sheet’
}
}).success(function(response){
var blob = new Blob([response], {type: ‘application/vnd.openxmlformats-officedocument.spreadsheetml.sheet’});
$scope.saveAs(blob, ‘my_excel’ + ‘.xlsx’);
}).error(function(){
//Some error log
});
};
http://stackoverflow.com/questions/6628476/renaming-a-virtualenv-folder-without-breaking-it
If you want to fix this manually, that is the way:
VIRTUAL_ENV=’/tmp/myproject/env’ => VIRTUAL_ENV=’/tmp/project/env’
2. modify /tmp/project/env/bin/pip in Line 1
#!/tmp/myproject/env/bin/python => #!/tmp/project/env/bin/python
“””
Load data in a json file into mongo db
“””
import os
import json
from pymongo import MongoClient
CONN_STR = ‘mongodb://{}’
CONN_STR_AUTH = ‘mongodb://{}:{}@{}’
DB_NAME = “”
MONGO_SERVER = “127.0.0.1:27017”
conn_str = CONN_STR.format(MONGO_SERVER)
conn = MongoClient(conn_str)
db = conn[DB_NAME]
def get_collection_name_by_file(file_path):
“””
“””
collection_name = os.path.splitext(os.path.basename(file_path))[0]
return collection_name.replace(“-“, “_”)
def load_array_to_db(data, clear=False):
“””
“””
collection_name = get_collection_name_by_file(json_path)
collection = db[collection_name]
if clear:
# db.drop_collection(collection_name)
collection.remove({})
for item in data:
collection.insert(item)
def load_json_file_to_db(json_path, clear=False):
“””
“””
try:
with open(json_path) as data_file:
data = json.load(data_file)
load_array_to_db(data, clear)
except Exception as e:
print “load json file failed with error : {0}”.format(e.message)
print “Finished…”
if __name__ == ‘__main__’:
base_dir = os.path.dirname(os.path.realpath(__file__))
json_path = os.path.join(base_dir, “follower.json”)
load_json_file_to_db(json_path, clear=True)
$scope.regularAssignmentGridOptions = {
rowTemplate: ‘
‘,
columnDefs: [
{name: ‘grade’, width: ‘5%’},
{name: ‘type’, width: ‘8%’},
{name: ‘start’, width: ‘6%’, displayName: ‘Start Level/Score ‘},
{name: ‘target’, width: ‘6%’,displayName: ‘Target Level/Score ‘},
]
}
import json

user = {
    "name": "Test",
    "_id": "1234567890",
    "address": {
        "street": "De Anza",
        "city": "San Jose"
    }
}


json_from_user = json.JSONEncoder().encode(user)

print json_from_user

user_from_json = json.JSONDecoder().decode(json_from_user)

print user_from_json
http://hardwarefun.com/tutorials/creating-robots-using-arduino-h-bridge

The following is the explanation for the different pins of the IC.
Vcc1 (pin 16) takes in regulated 5V for operating the IC.
Vcc2 (pin 8) takes the external voltage (up to 36V) which
1,2 EN (pin 1) and 3,4 EN (pin 9) are the enable pins for the two motors
1A (pin 2) and 2A (pin 7) are the control pins for Motor 1. These will be connected to Arduino.
1Y (pin 3) and 2Y (pin 6) are the output pins for Motor 1. These will be connected to the first motor.
3A (pin 10) and 4A (pin 15) are the control pins for Motor 2. These will be connected to Arduino.
3Y (pin 11) and 4Y (pin 14) are the output pins for Motor 2. These will be connected to the second motor.
pins 4,5,12,13 are Gnd pins

1. Buy a “Page Plus Cellular Prepaid Wireless Airtime Minutes Refill” at http://www.callingmart.com/
Select 2 Steps to Buy a Wireless Refill
Select “Page Plus Cellular Prepaid Wireless Airtime Minutes Refill” and $80
Before Checkout, try to find out(Google) Coupon Code. The coupon code can save your money.
After that, you will get a PIN number
2. Go to https://www.pagepluscellular.com/
Select Activate  or
or  to active your CDMA cellphone by providing the ESN or MEID of your cellphone and the PIN number you got from http://www.callingmart.com/
If you don’t know what is ESN or MEID, please go to https://www.pagepluscellular.com/activate/new-activation/
3. After step 2, you will go a serial number. You can active your phone by dialing this serial number with your phone.
Now, your phone works.
| Mr WordPress on Hello world! | |
| zhi on 《Windows用户态程序高效排错》 中涉及到的链接(ZT) | |
| Amanda on 歌颂祖国,我们不差钱 | |
| Eternal on 歌颂祖国,我们不差钱 | |
| Eternal on English Reading:关于中国成为世界第二的真相 |